Moon Photo Stacking
Overview
I recently learned about stacking and editing moon photos. I am no expert, but I just wanna note down what I've learned here in case it could be useful.
The general idea is this. You get caught between New York City and the Moon—yeah, I know it's crazy, but it's true. The best you can do is take out your longest focal length lens and shoot a few photos of chị Hằng. But since the Moon is so far away, we have to shoot it through a lot of atmosphere. Turbulence in the atmosphere makes the Moon shimmer, blur, and distort from one moment to the next. If you remember videos of the Moon taken through a telescope, it's always undulating. That's the interference. See this example below:
One way to deal with that is Lucky Imaging. The idea is to take a lot of photos, then keep only the sharpest ones, which happen to be taken during moments of relatively stable air. We align and stack these good frames together. Selecting the good frames helps us avoid atmospheric blur, while stacking reduces random noise and gives us a cleaner image that can tolerate more sharpening. Now, some simple math.
In an ideal case, each aligned image can be written as the same signal + independent random noise:
Average images:
The signal stays the same.
For independent noise, variances add:
Therefore, the variance of the averaged noise is
So its standard deviation is
Therefore:
For example, stacking images reduces random noise to and improves SNR by .
Of course, this is an ideal result. Video compression, correlated noise, imperfect alignment, and changing atmospheric distortion mean the actual improvement may be smaller. Stacking also can't restore details that are already blurred in every frame. That's why we wanna select the sharp frames first instead of just stacking everything.
How many images should we stack? I have no idea—again, I'm no expert. I've had good results with a few hundred, so maybe a few hundred is a good starting point. But these few hundred are only what we keep from the many more we've taken. How do we get so many? Don't shoot photos; take a video. Assuming we're making a one-minute video at 24 fps, that's already 1,440 images! If we keep 200 of them, that's less than 14%!
Cool, so the general idea is: take a video → extract good frames → stack them → edit.
Step 1: Taking video of the Moon
You need a long focal length. I read somewhere on Reddit that it's recommended to use at least 400–500mm for the Moon. I don't know, but I happen to have the TTArtisan 500mm F6.3. I've mostly used this lens for taking photos of the Moon, and I think it works very well for that. After all, the Moon is so bright that it's quite easy to work with. Just a personal note on this lens: if you intend to buy it and happen to have a camera with a shorter flange distance, such as a Fuji or Nikon, get the Canon EF version. I have a Fuji and got the Fuji version, so I'm stuck using it only on Fuji. If I had gotten the Canon EF version, it would've been super easy to adapt it to Fuji using a dumb adapter, which would've given me a 750mm-equivalent field of view. If I wanted a roughly 500mm-equivalent field of view, I could use it on my Fuji with a speed booster, which would also give me one extra stop of light. That could be very useful, as this is not a fast lens. Another downside of getting the Fuji version is that the mount is small. It physically blocks the output and restricts it to an APS-C image circle. When I adapt it to my Nikon Z5, it only covers a small area of the sensor for that reason. If I had gotten the Canon EF version, maybe it would've worked well on the Nikon too.
OK, enough ranting.
- Best to use camera + long focal length lens on a sturdy tripod
- Set camera to single point exposure and point to the center of the moon so that it's well exposured
- Video mode, choose highest quality
- Stop down to the sharpest aperture. For TTArtisan 500mm F8 works well for me. I just change ISO until it's well exposed.
- Press AEL, Auto Exposure Lock, so that the exposure is now locked to what we're having. This way even if the Moon drifts away and the focus point is no longer at the moon, it won't change exposure and lit up the moon!
- Record for at least 1m
At 750mm equivalent, the Moon stays well within the image area; see the video below. Since I'm stacking the whole Moon, that's what I want. Later on, the software that extracts the good frames also needs to detect where the Moon is, so it's best to have it in full view.
If you just wanna try stacking, you can use the video I took above. First install yt-dlp:
pip install -U yt-dlpThen download:
# let's use this as our working directory
mkdir -p ~/Desktop/test
yt-dlp https://www.youtube.com/watch\?v\=eHfdl7k50z0
This gives you a file called Full Moon [eHfdl7k50z0].webm inside ~/Desktop/test. I believe YouTube applies a lot of compression, so this won't be as good as the file from your camera, but it'll do for now. Now let's do some stacking!
Step 2 - Extract and Stack
Apparently, Autostakkert is the best. Unfortunately, Autostakkert is Windows-only 🥲. So I use Siril, which works great on macOS and is completely free too!
After installing it, use Siril's command line to navigate to our working directory, where we stored the downloaded video file.

Now that we're in that directory, select the Conversion tab in Siril and click on +. It'll open a window at ~/Desktop/test. Select the WebM file, then select SER Sequence, give the sequence a name (moon here), and click Convert.
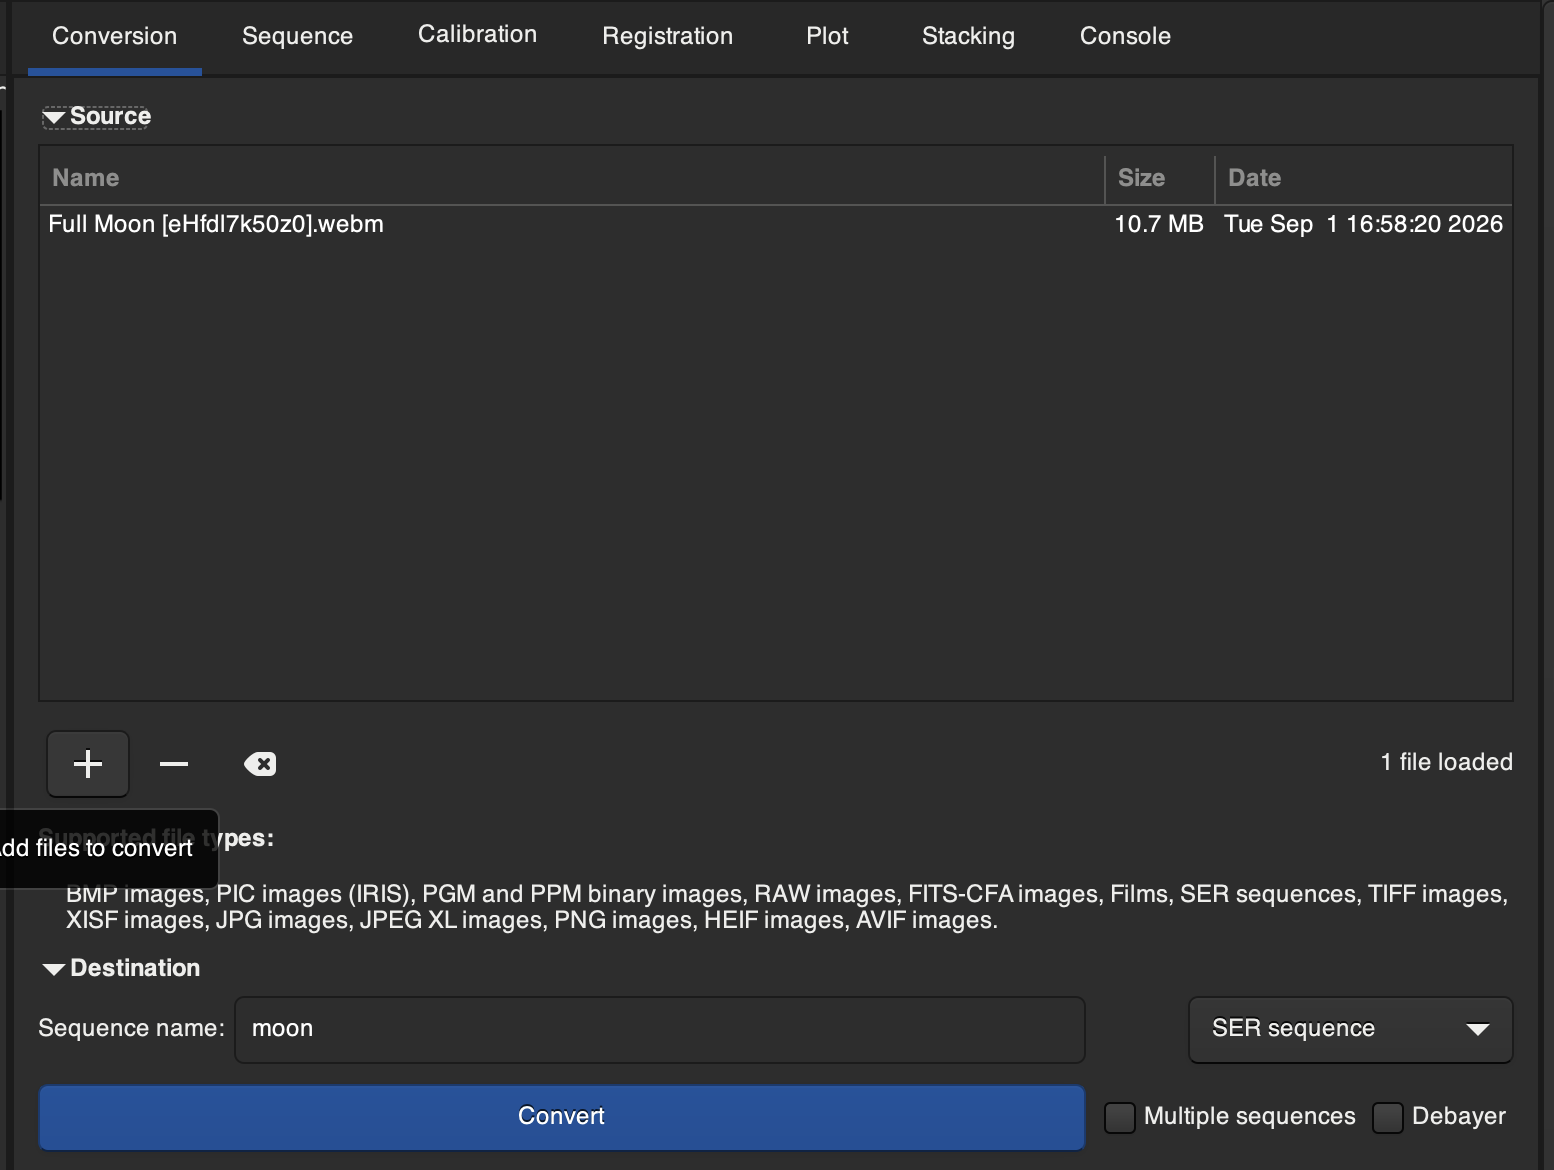
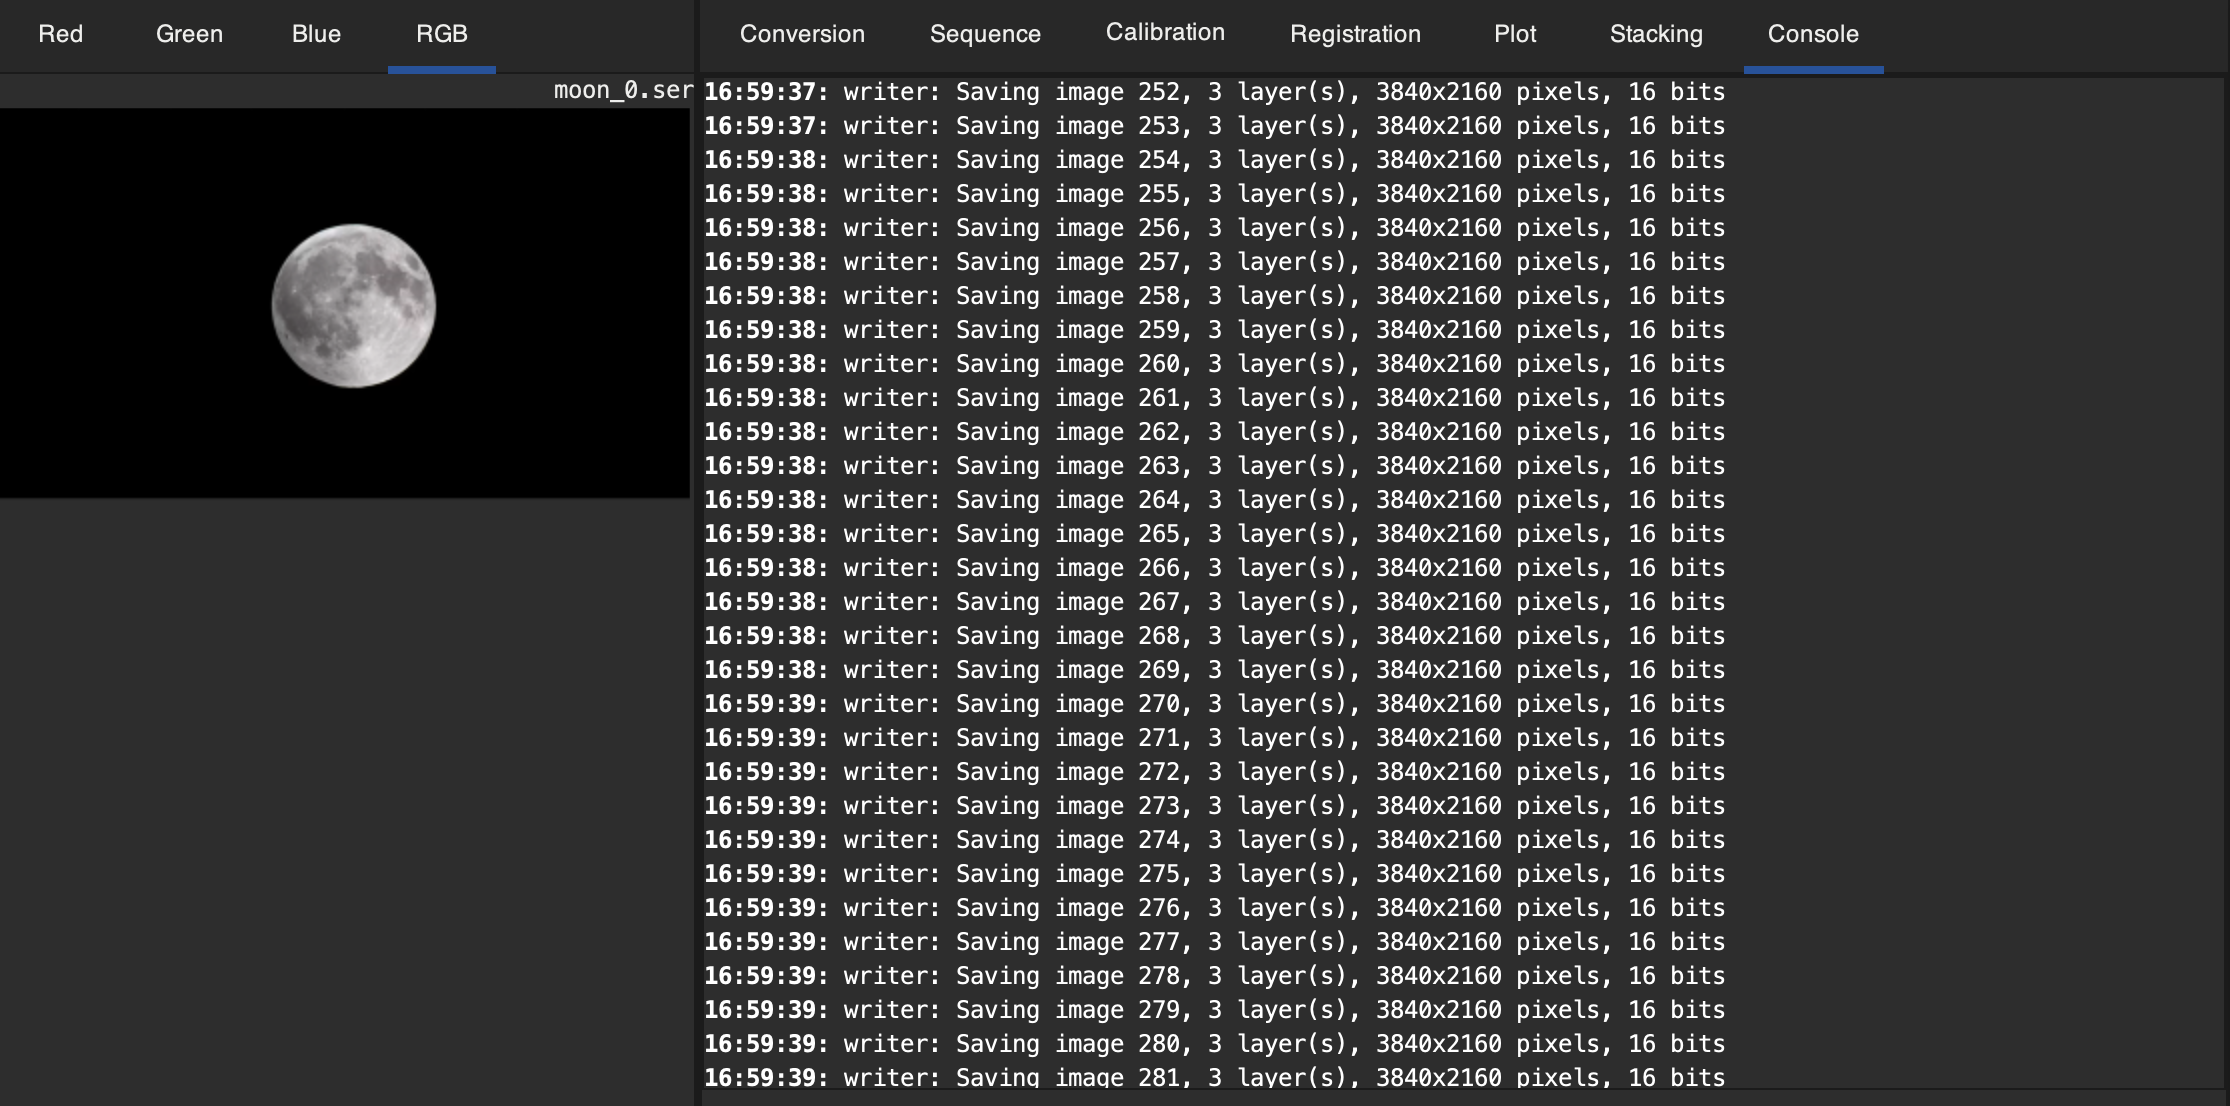
If you switch to the Console tab, you'll see output like this. It's extracting the frames. Once it's done, an image of the Moon will show up too. For this video, we end up with 1,979 frames.
Now we need to register the frames. From Siril's documentation:
Registration is basically the process of aligning the images from a sequence to be able to process them afterwards. All the processes described hereafter calculate the transformation to be applied to each image in order to be aligned with the reference image of the sequence.
Navigate to the Registration tab, you'll see something like this: 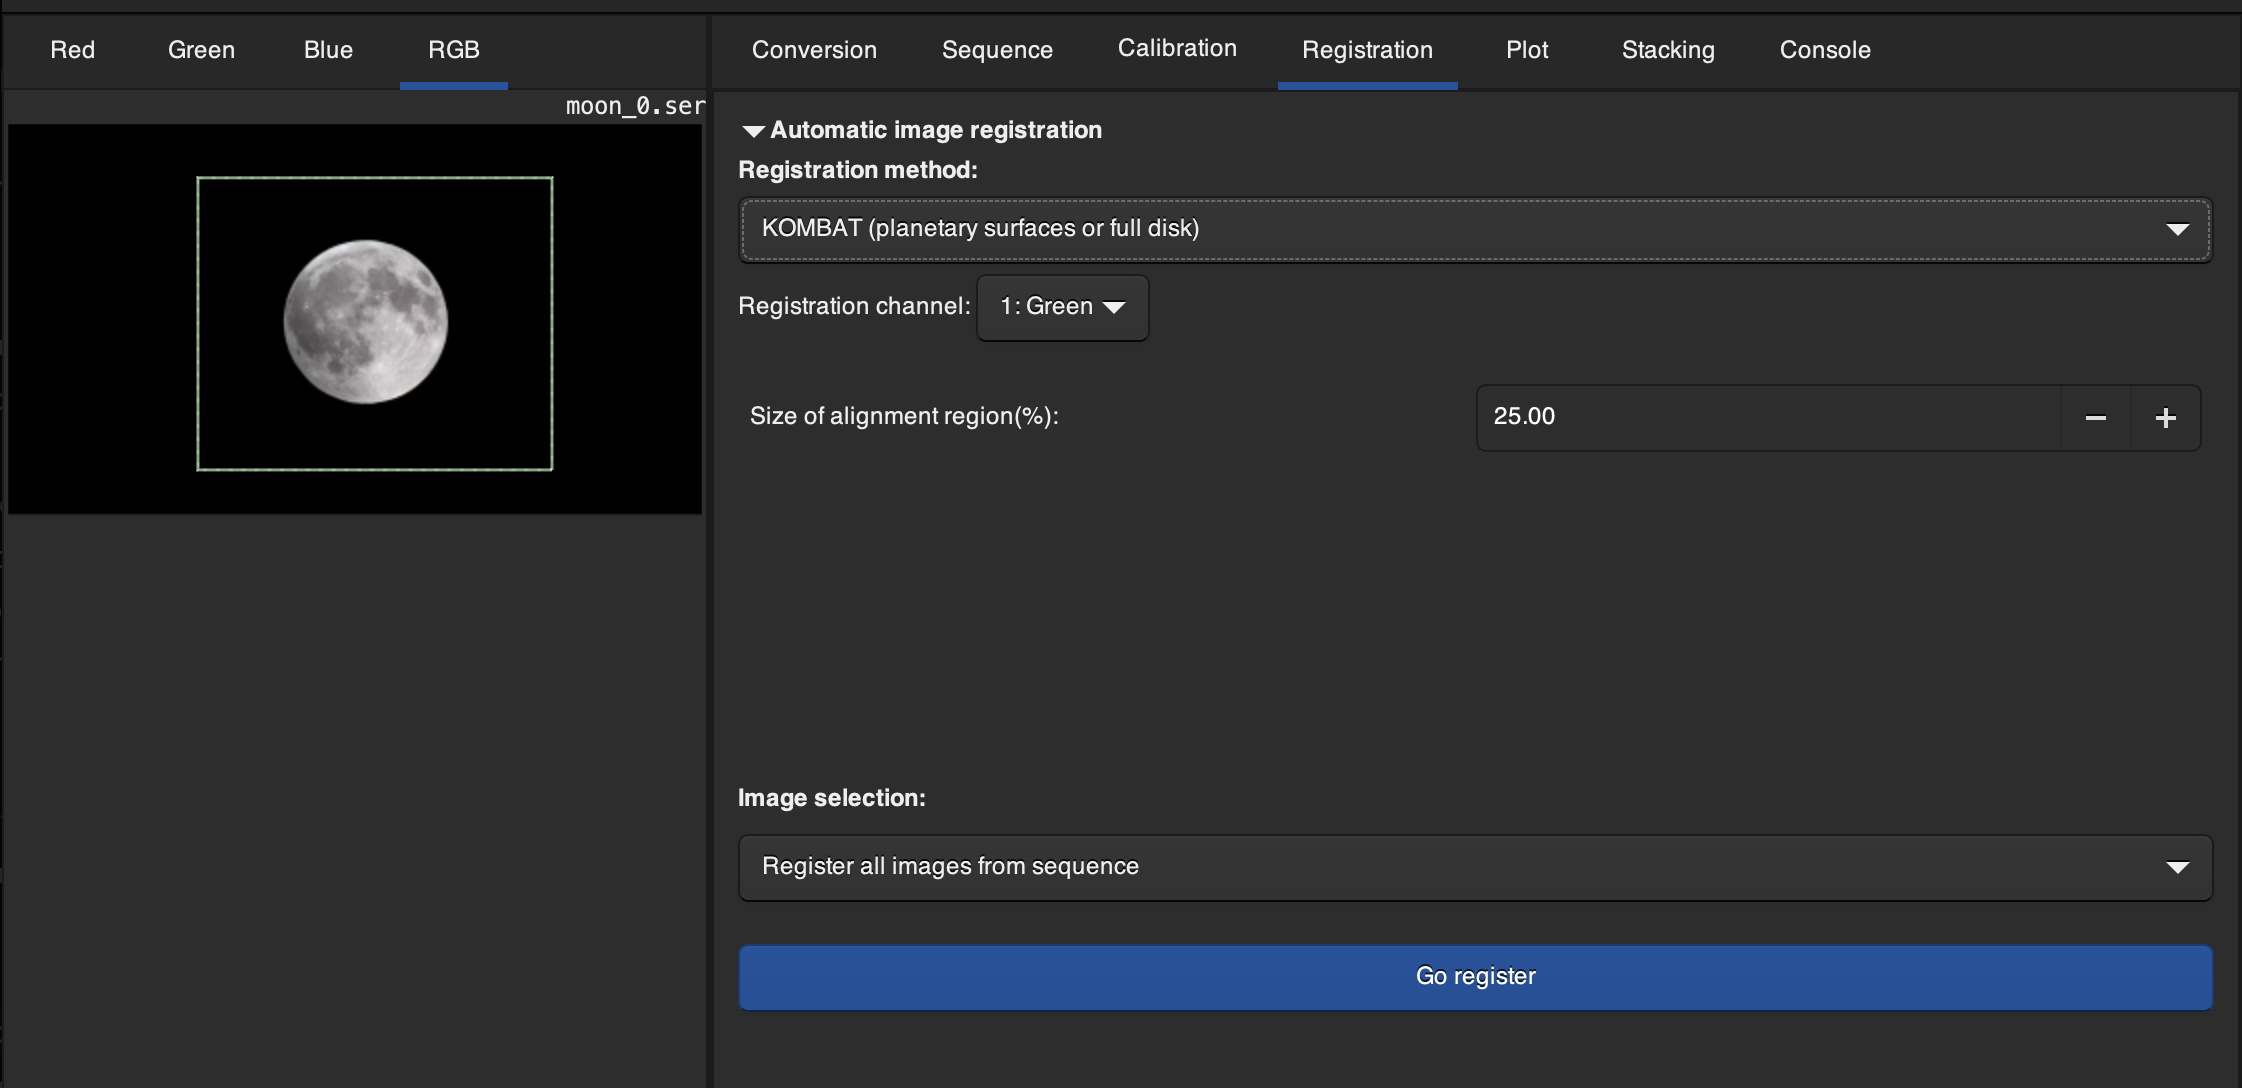
There are many registration methods, and I admit I don't fully understand any of them yet—I'm just using them for now. I use KOMBAT, and it has worked well for the Moon so far. This method needs to track and align the object, so we draw a box around the Moon to tell it which area to track (I think). I think the Moon should stay well inside the box throughout the video, though I haven't tested what happens if it doesn't. Once you've drawn the box, click Register. It'll take a while.
Once that's done, navigate to the Plot tab. You'll see something like this:
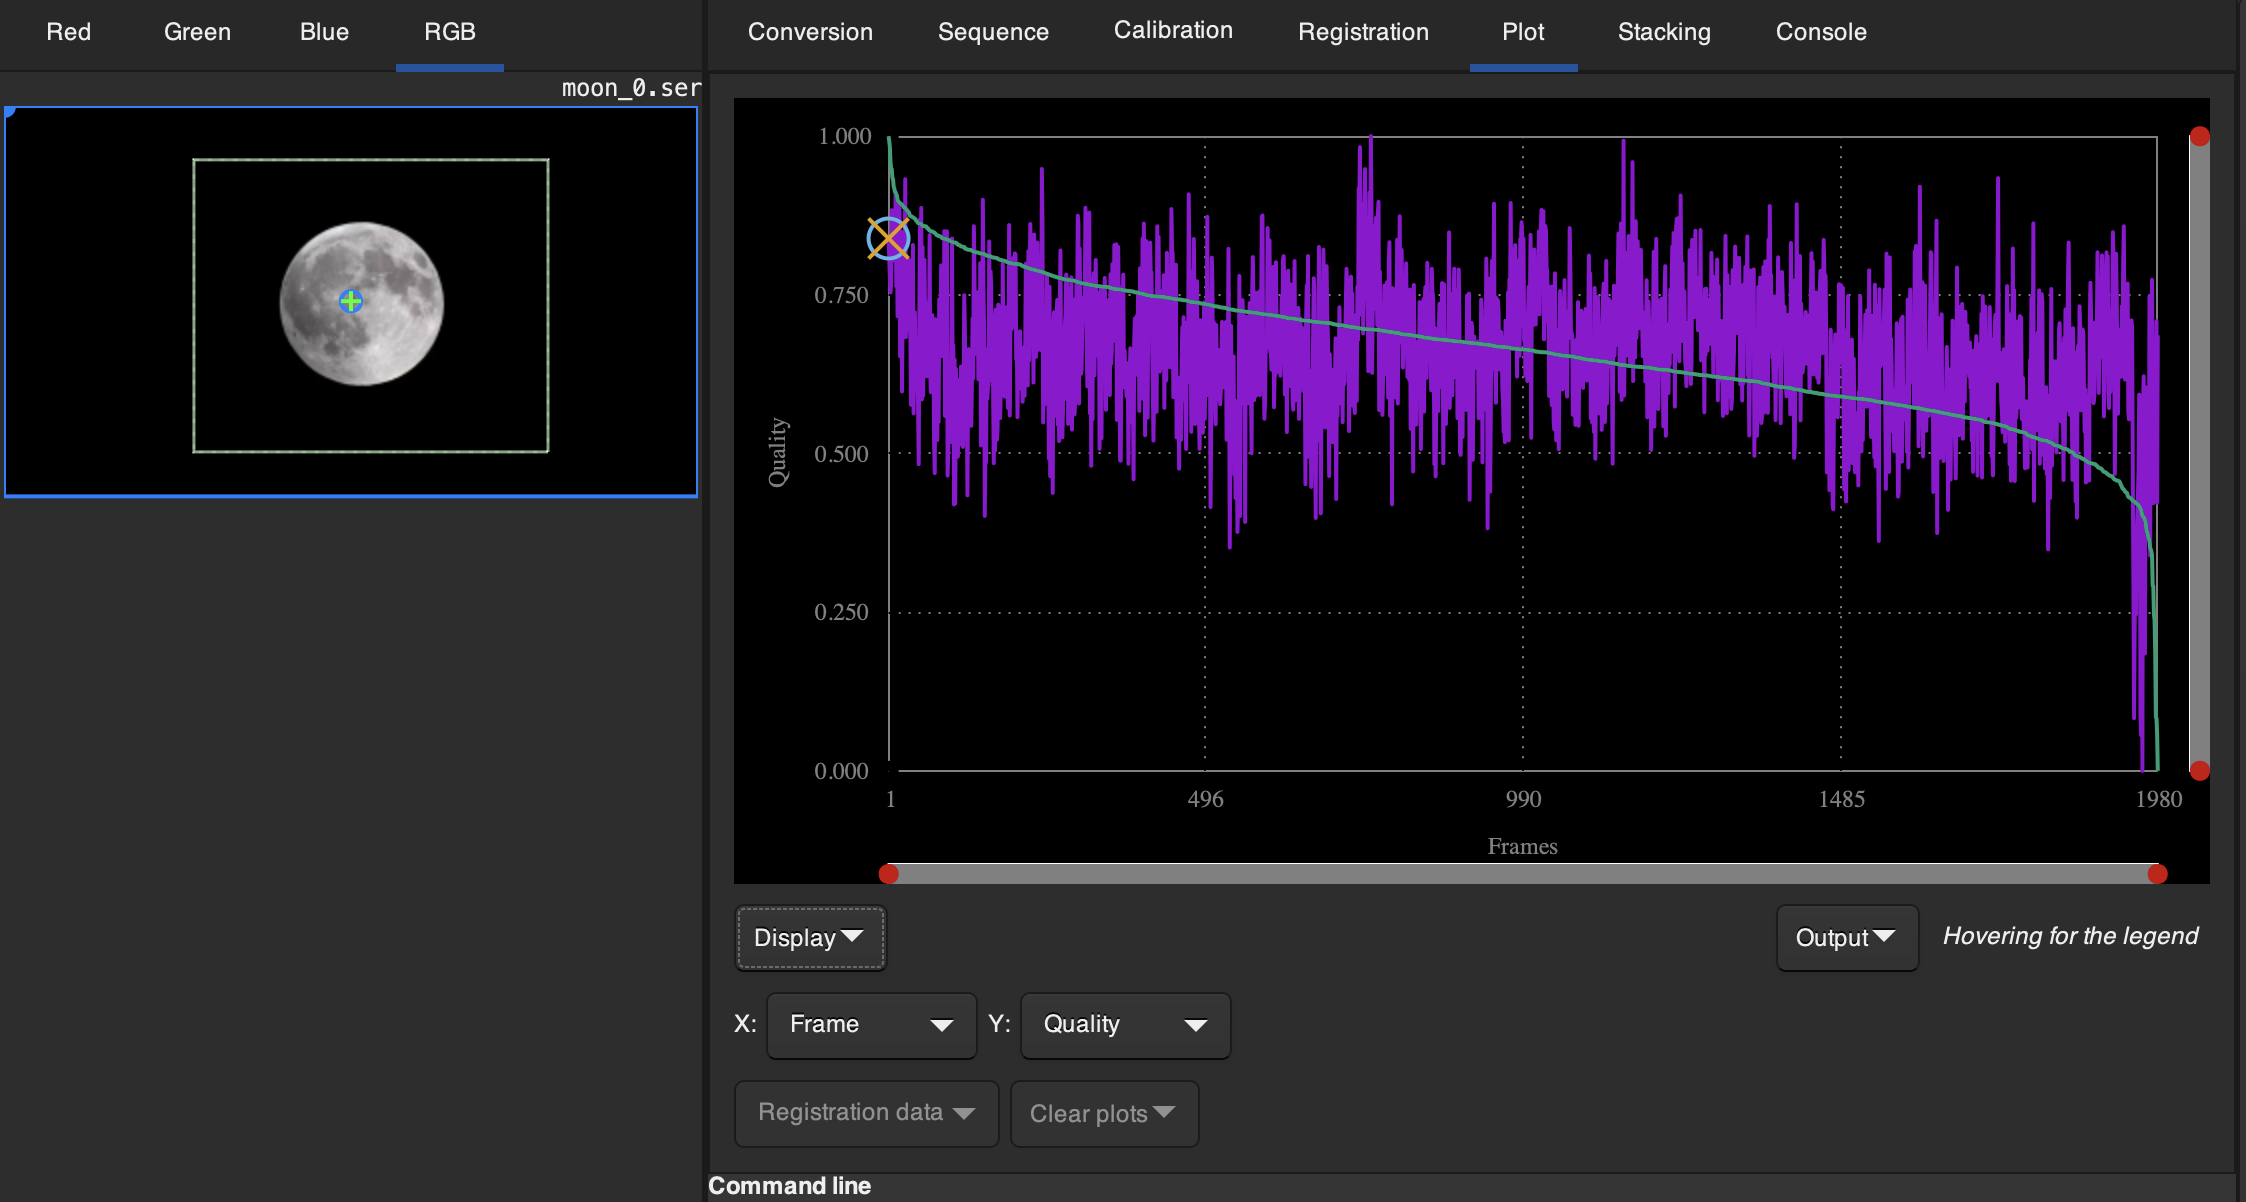
I'm not 100% sure, but I think this quality score is a relative ranking score, not an absolute one. Essentially, we're ranking all the frames from top to bottom in terms of quality, and each is assigned a score, with 1 being the highest and 0 the worst. Now we'll select which frames to use for stacking based on this score.
Navigate to the Stacking tab and select Sum stacking for Method. Again, there are many stacking methods, and I haven't tested them all, but Sum stacking has worked well for the Moon so far. Go to Image rejection, choose quality, and select what percentage of the frames you wanna use for stacking. Changing this also shows the quality-score threshold used to select images. I usually rely on the quality-score threshold to determine how many to keep because I think increasing the number of frames at the cost of introducing bad ones might give a worse result. What threshold should you use? I don't know. I often try 0.75 or higher, and that has worked well so far. Now just click on Start stacking and wait a bit.
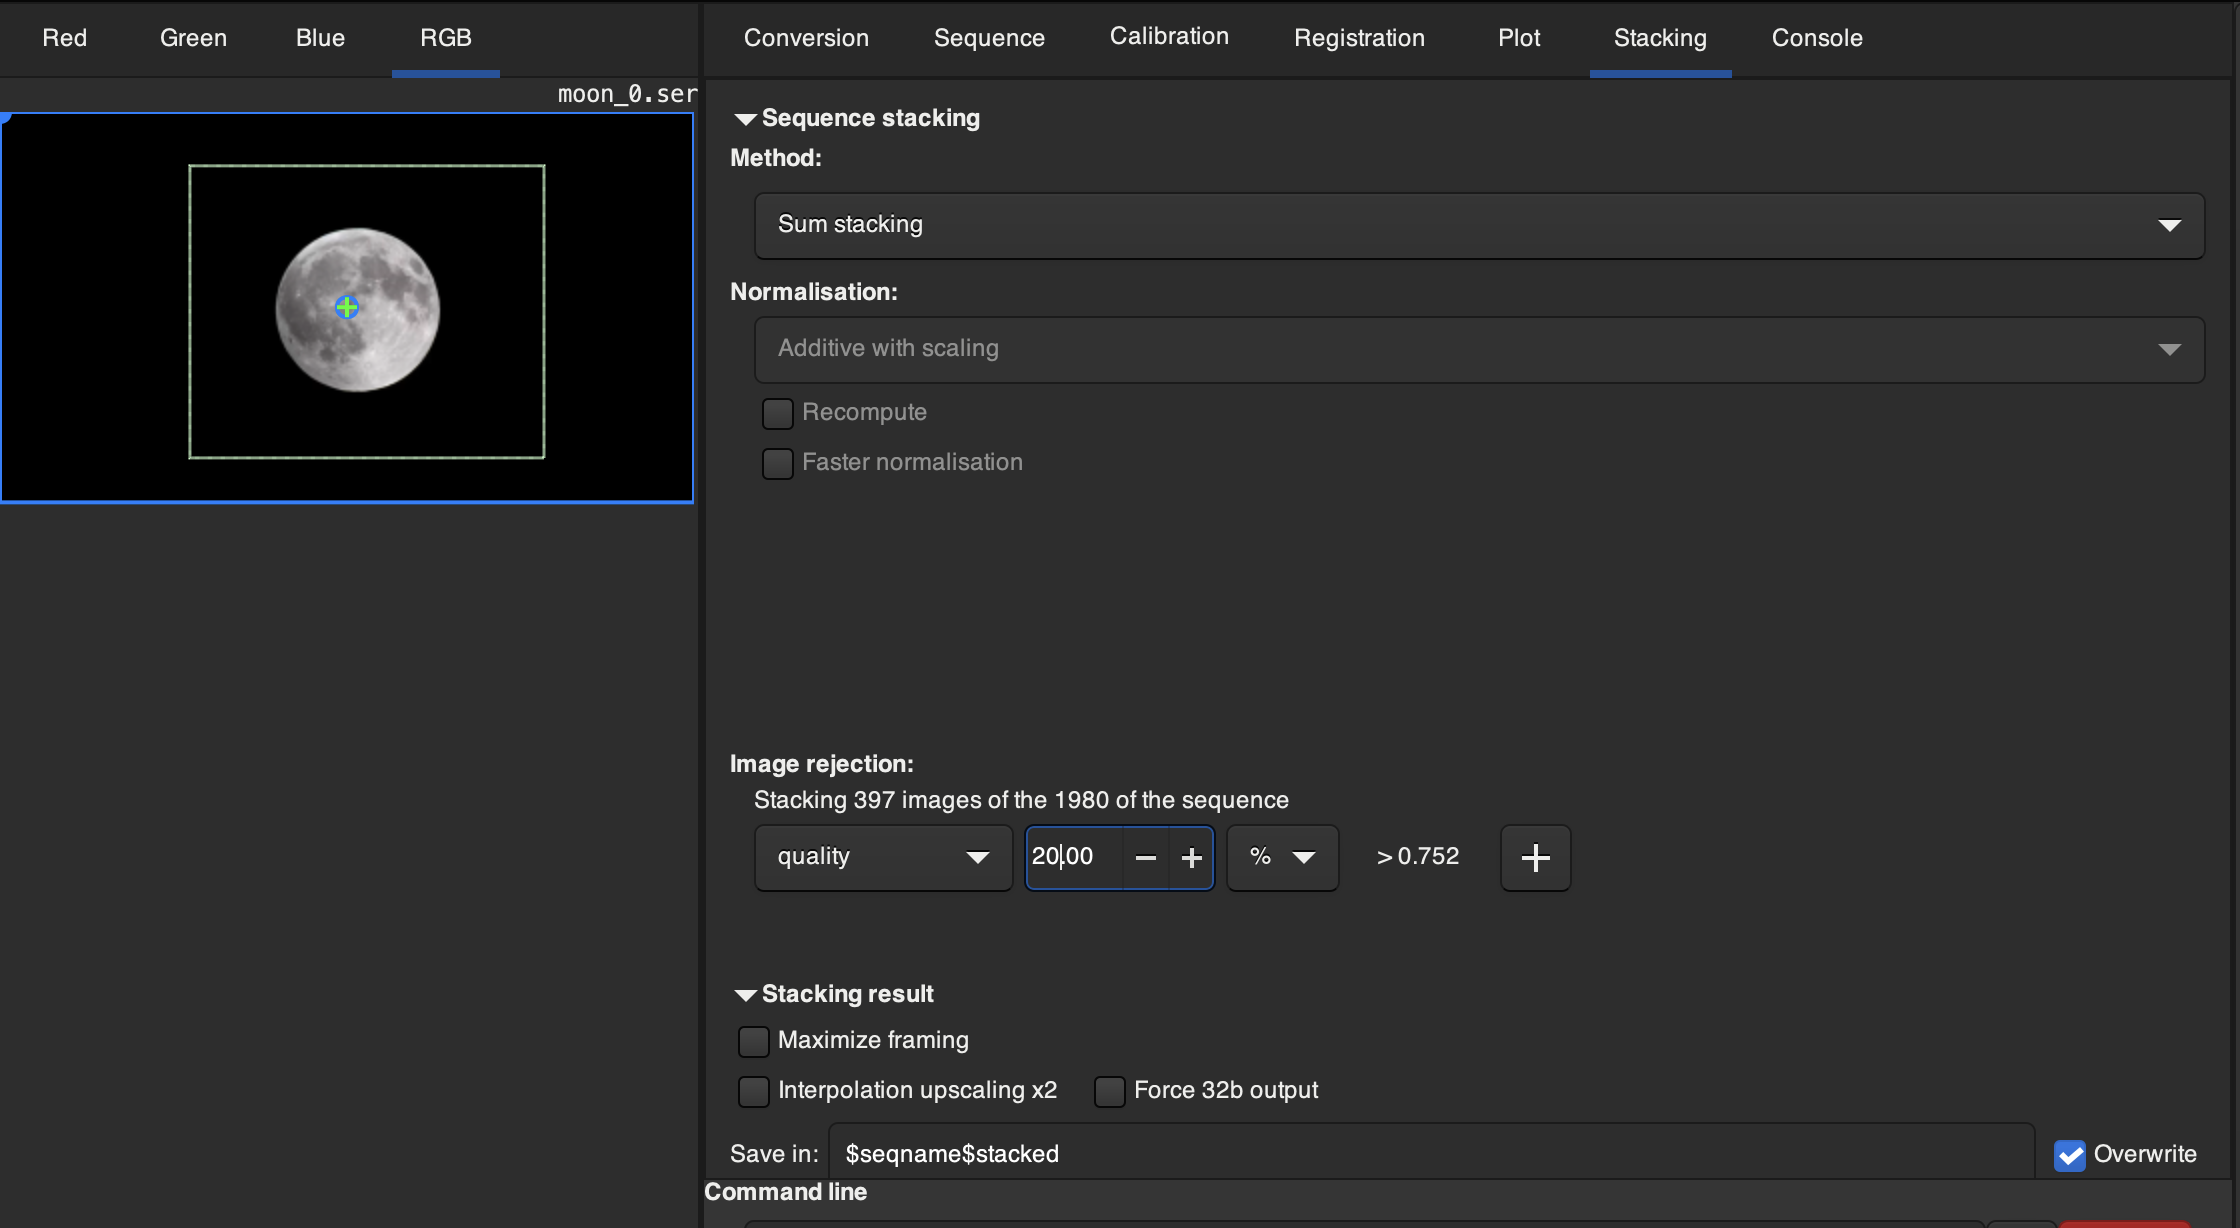
Now navigate to Console again. You'll see something like this: 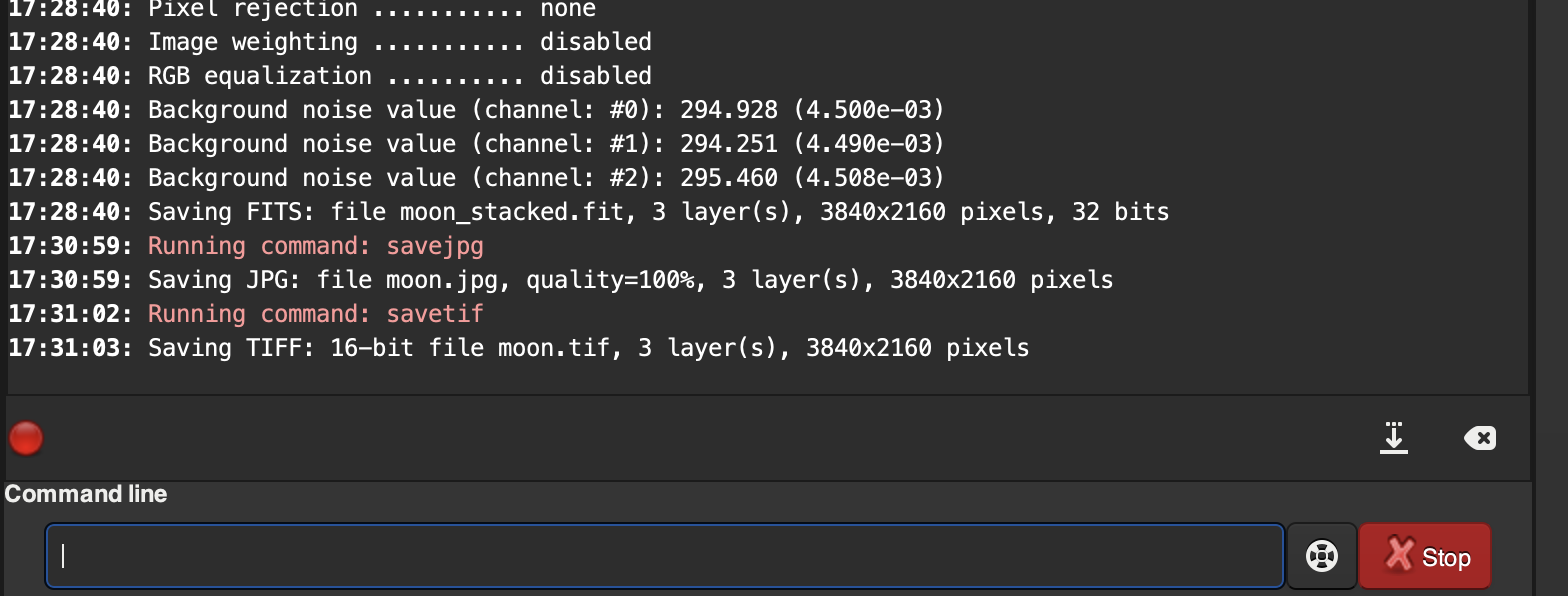
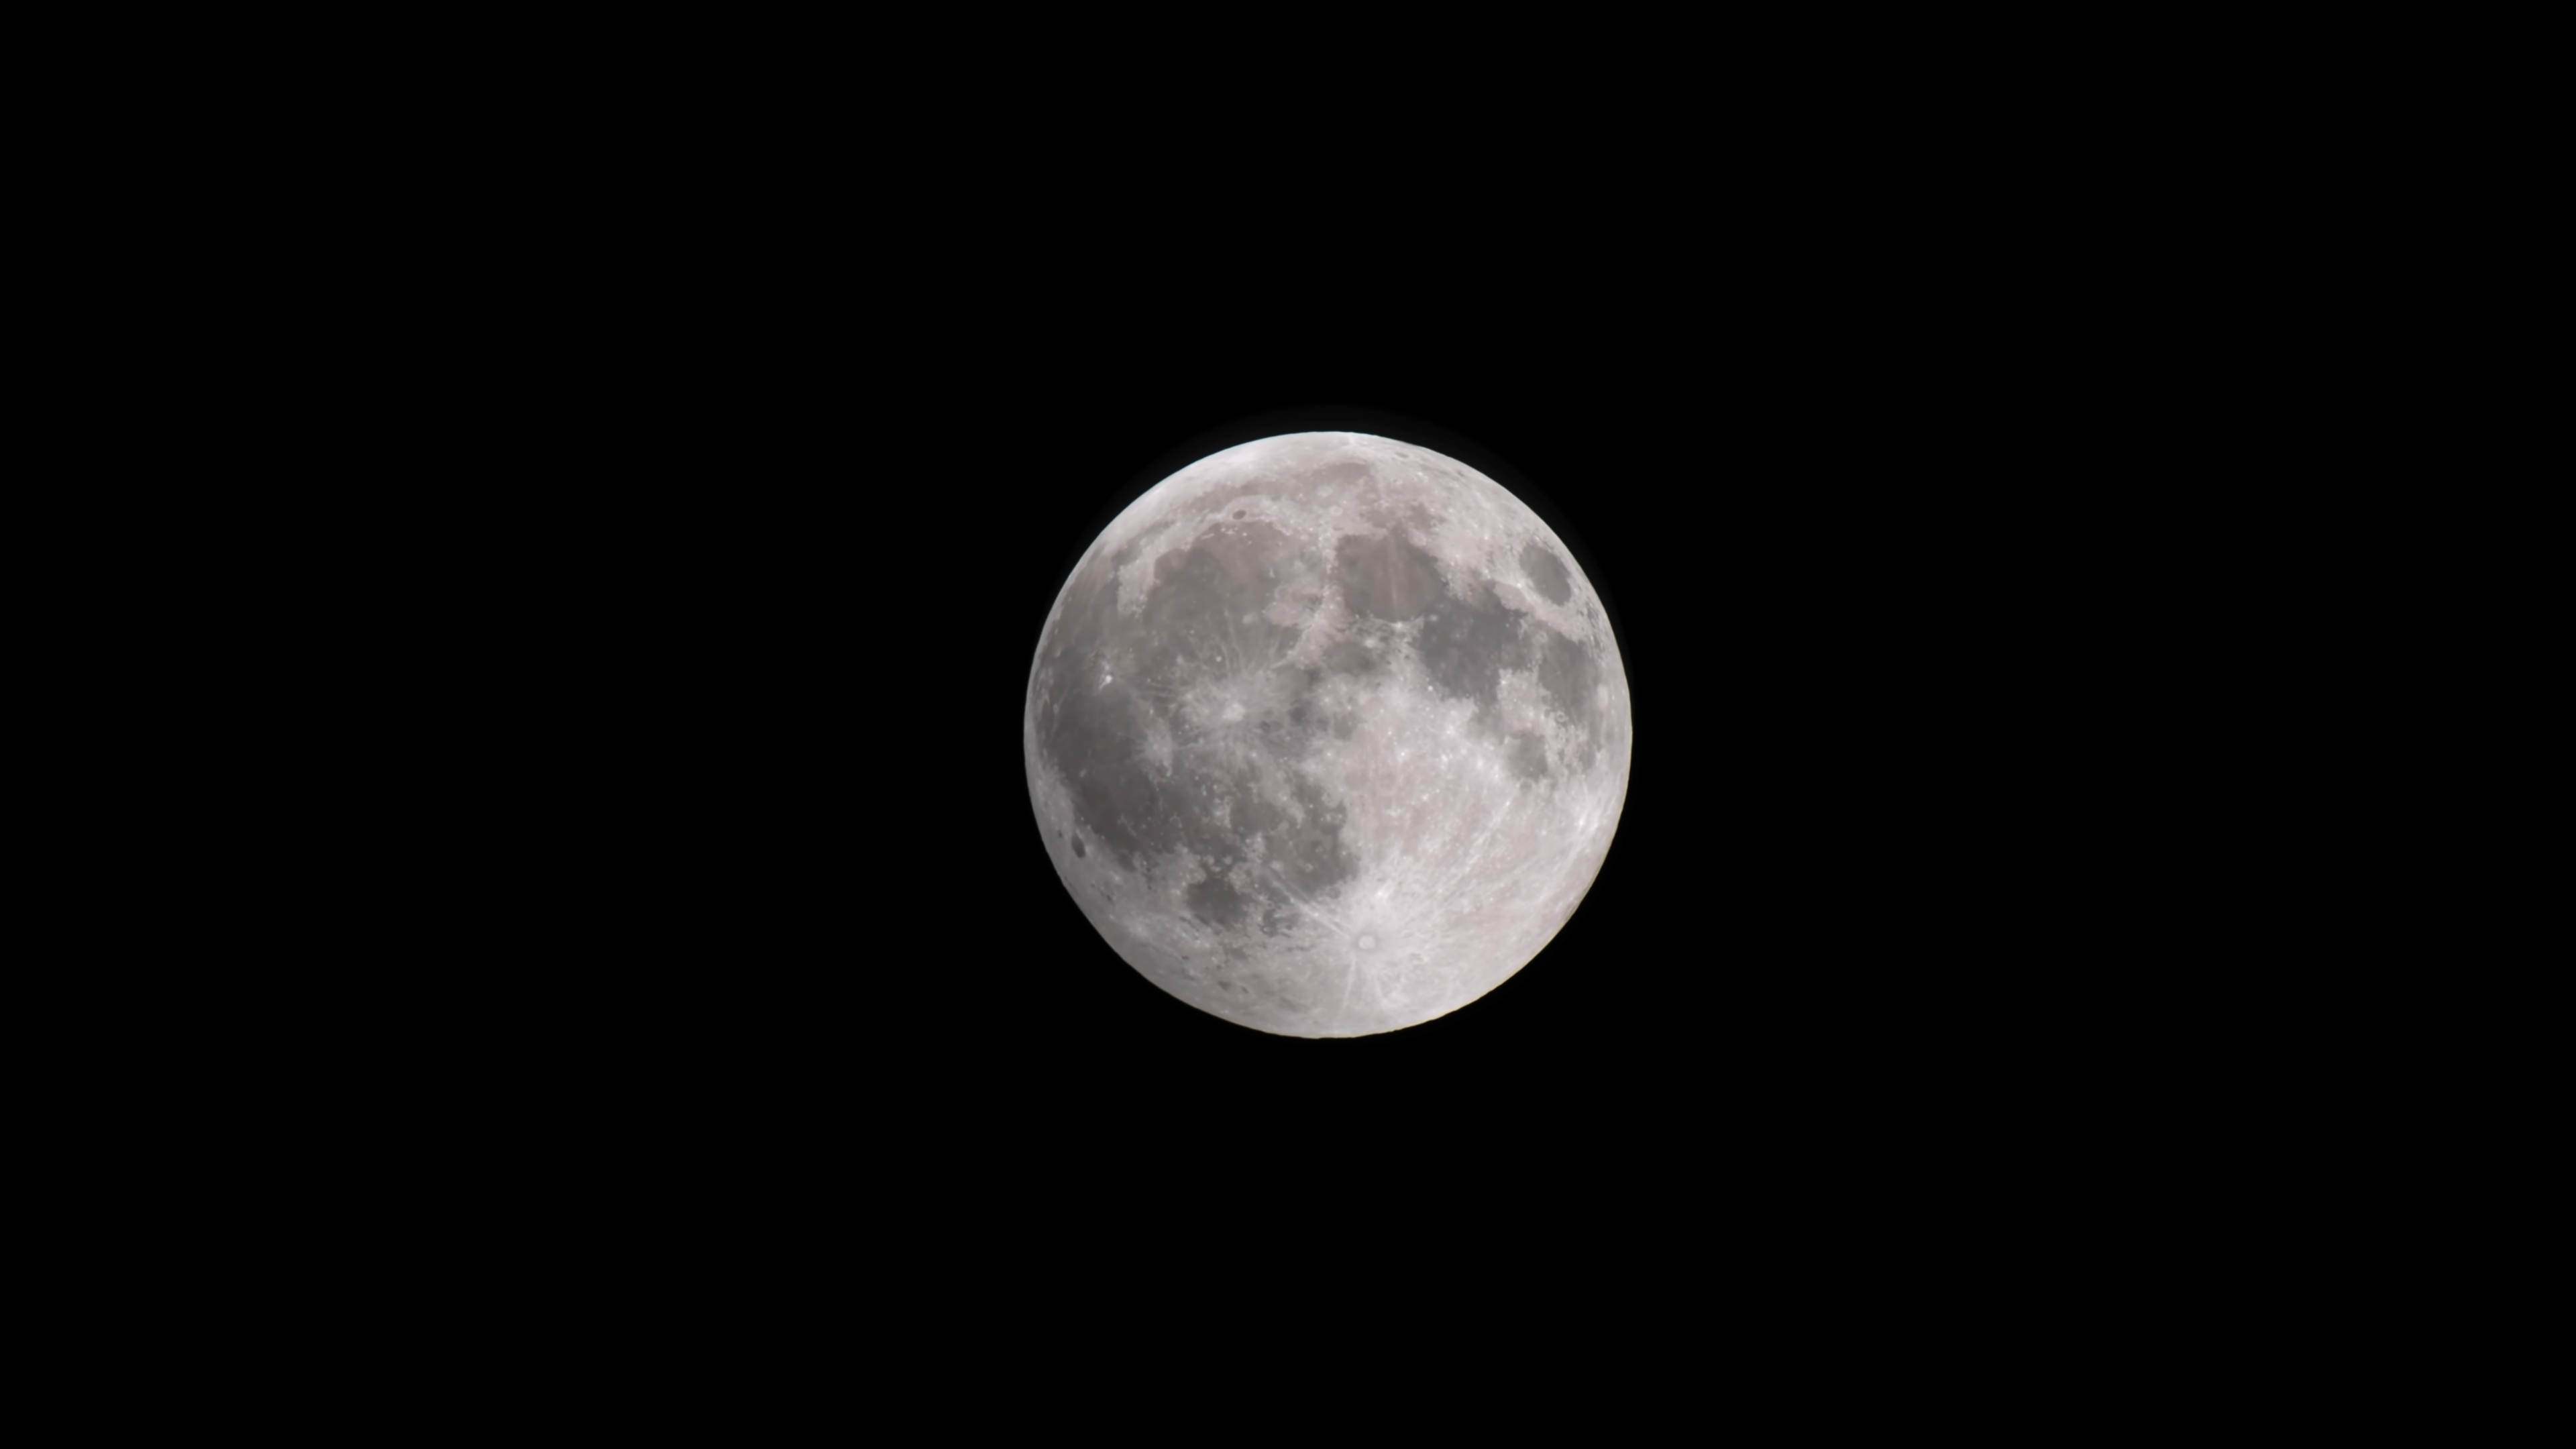
Our stacking is done! We can take a peek by entering savejpg moon and pressing Enter. It'll save a moon.jpg, as shown below. As you can see, it looks good, but we want something better. Let's save a TIFF image, which is lossless and can therefore be used for further editing. Simply type savetif moon into the command-line box and press Enter. It'll save a rather large file called moon.tif (~47MB, compared to the 370KB lossy moon.jpg).
Step 3 - Editing
This is the fun part!!! I've got next to zero experience with editing, so I'm basically following Vaonis' tutorial. I have Affinity Photo, so that's what I'm using, but other editing software works too.
I only do the following things:
- high-pass filtering: The Moon contains a lot of high-frequency information, such as the edges of craters. By frequency here, we mean spatial frequency. Around the craters, pixel values change rapidly and are therefore considered "high-frequency." We want to enhance this, so we use high-pass filters.
- color enhancement: This is what's often called a "Mineral Moon." The idea is that different parts of the Moon have different chemical and mineral compositions and therefore reflect slightly different colors. The differences are very, very small, so the Moon simply looks gray to our naked eyes. But we can boost these differences by increasing the saturation, which will add some color to the final image.
Right-click on moon.tif and open it with Affinity Photo. First, let's crop it. Just select the crop symbol in the box on the left, draw a rectangle around the Moon, then press Apply. 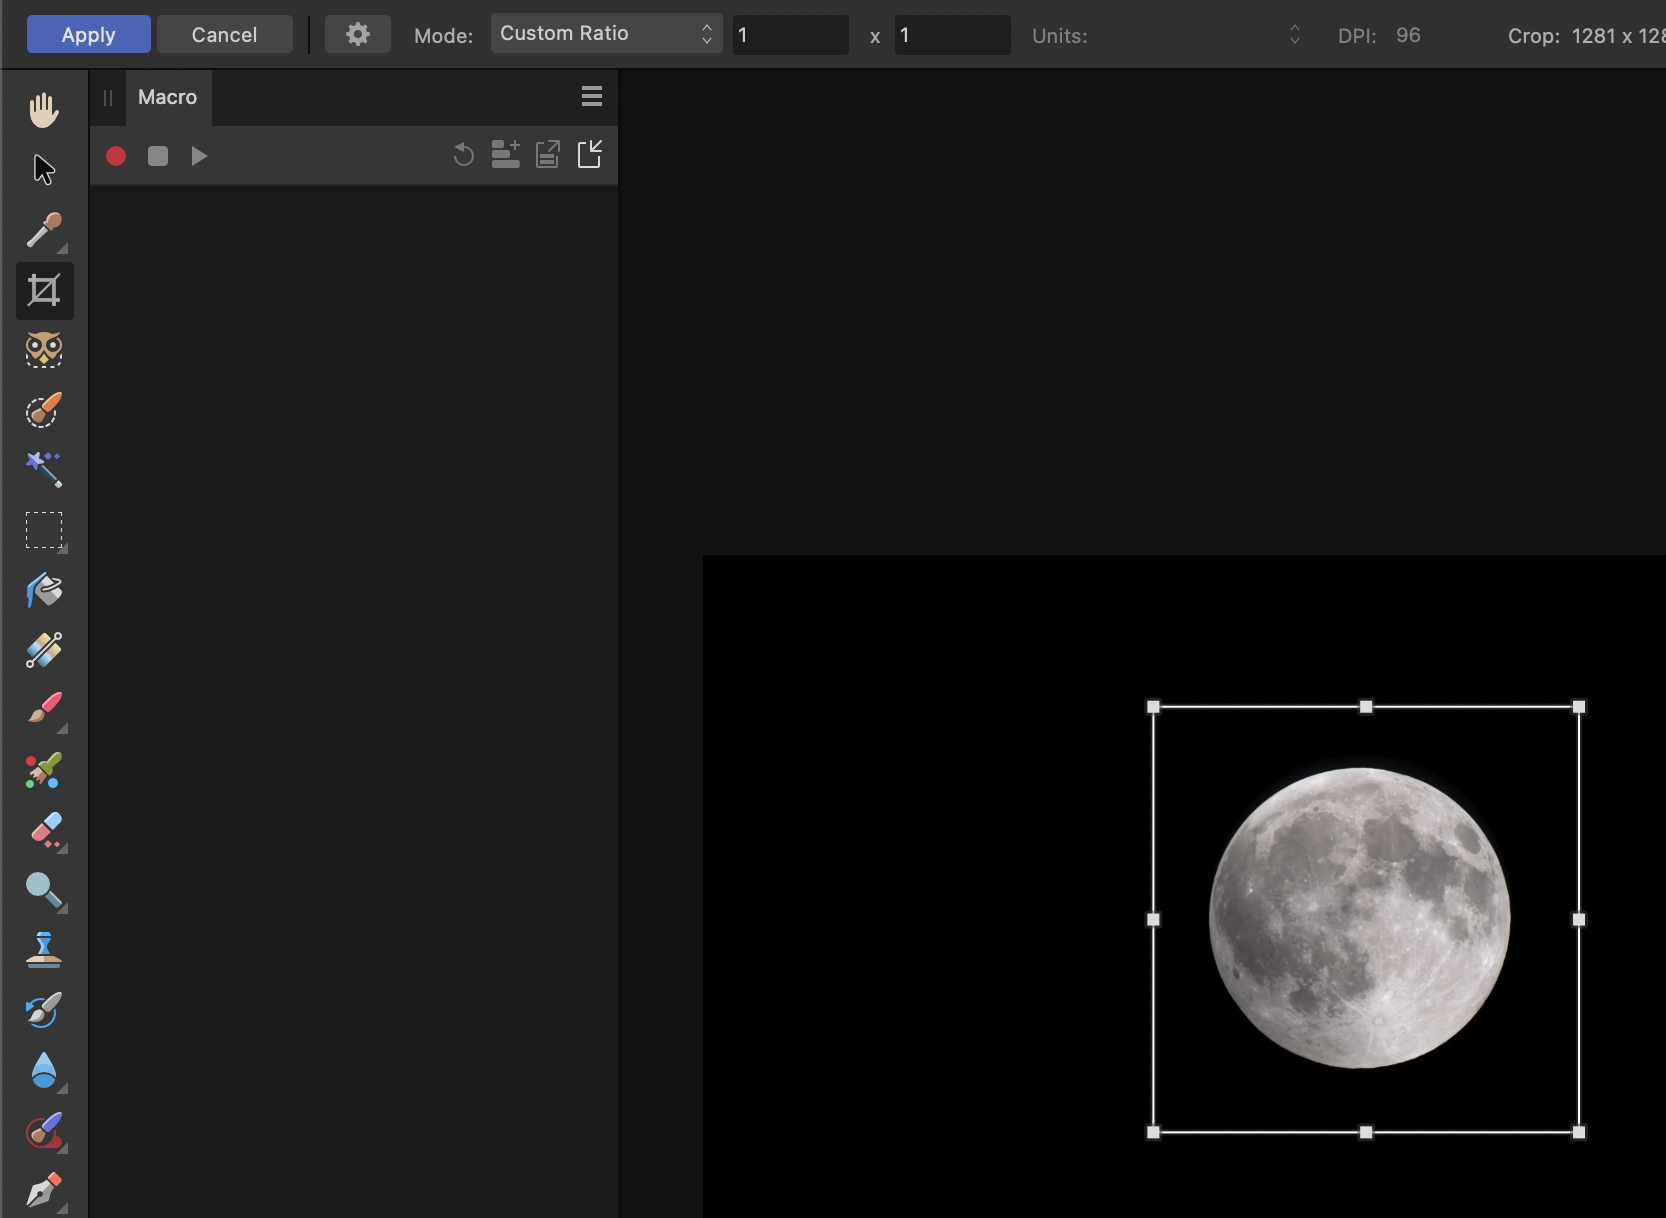
Add a high-pass filter: 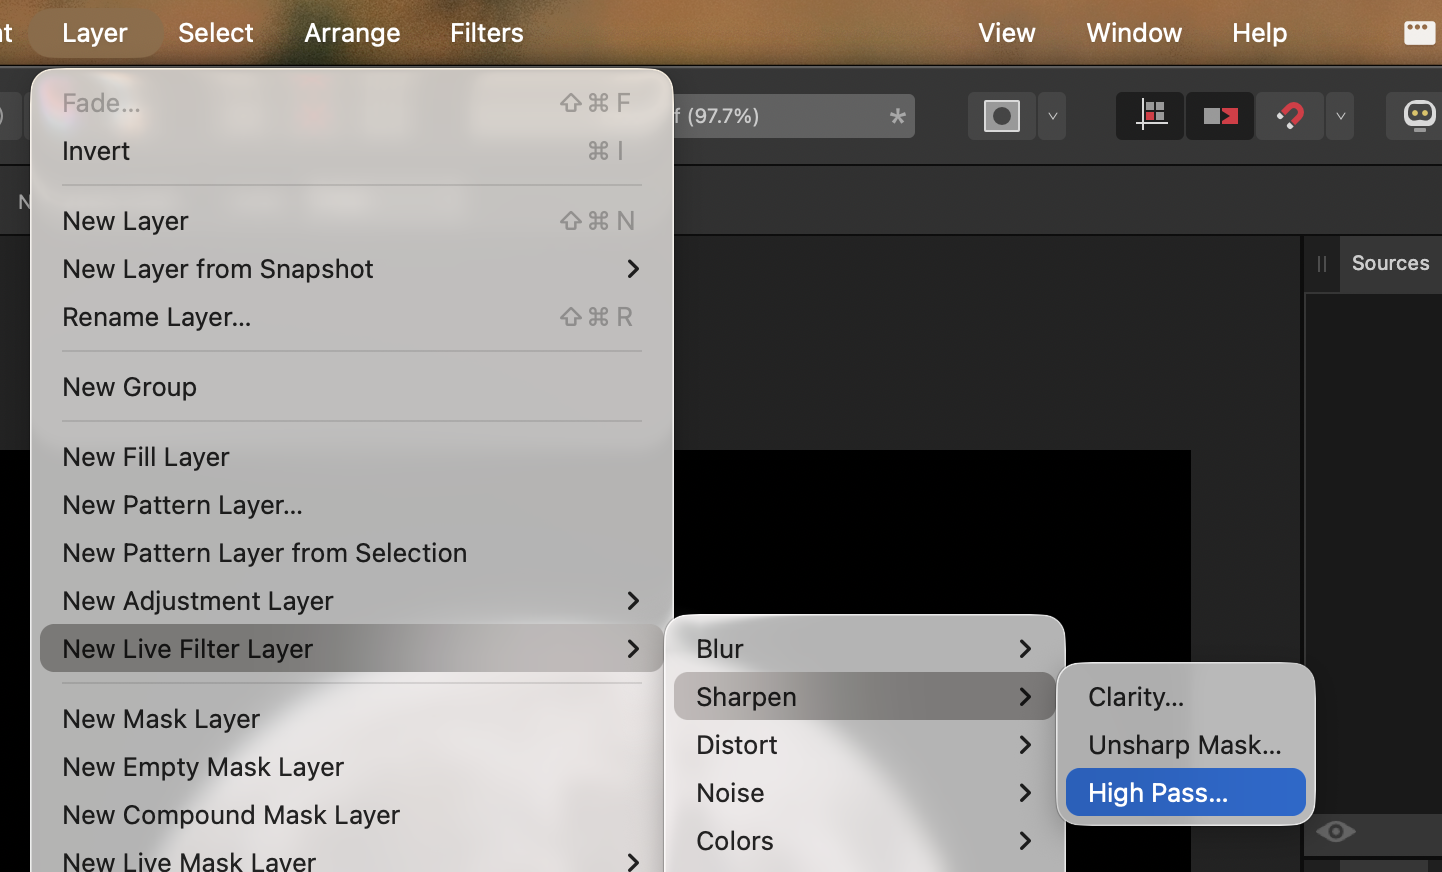
The filter layer is added to the box on the right under the Layers tab. Move it above the Background (our base image). If you click on the symbol for the high-pass filter, it'll open a control box where we can change the filter's parameters. Set the radius to 1px and use Linear Light. Press Enter and close it. 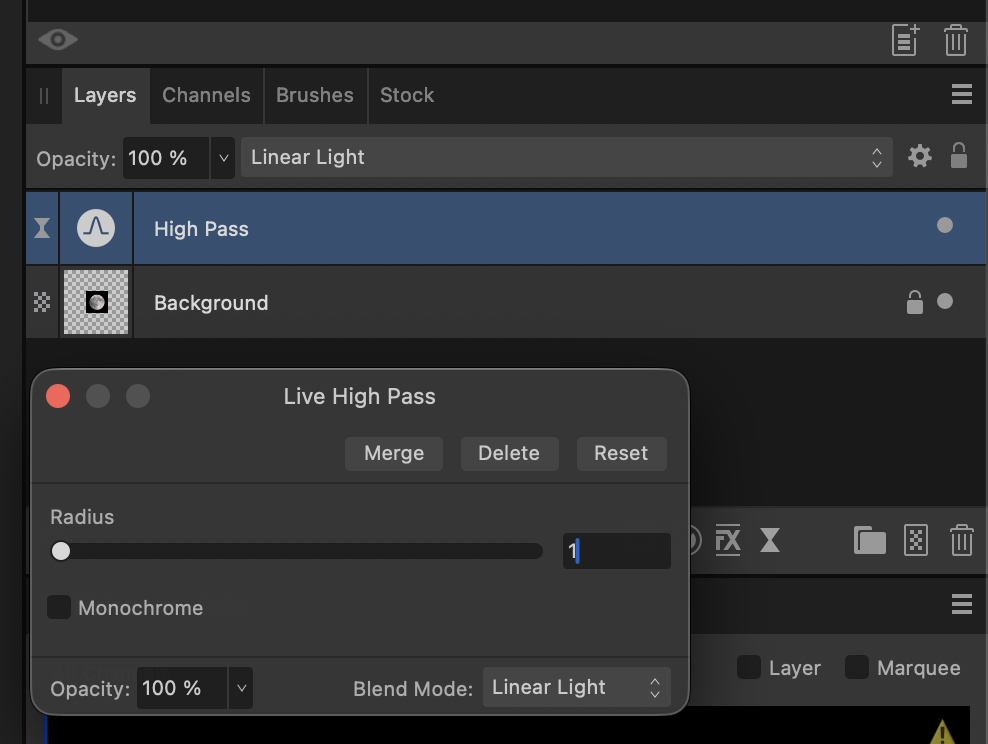
You can select that high-pass filter, press Cmd+C, then press Cmd+V to paste it and create new filters. They'll work in a chain, meaning filter 1 → filter 2 → ... I use four filters, all with Linear Light, with radii of 1px → 1px → 0.5px → 0.1px. As you add more filters, you'll see the areas around the craters become sharper. How much you do depends on your taste.
Now we change the saturation. Go to Layer → New adjustment layer → HSL.... Again, I copy and paste to get multiple layers, and they'll work in a chain. You can play around with the settings for each one. In this example, I change only Saturation: 50% → 25% → 10%. 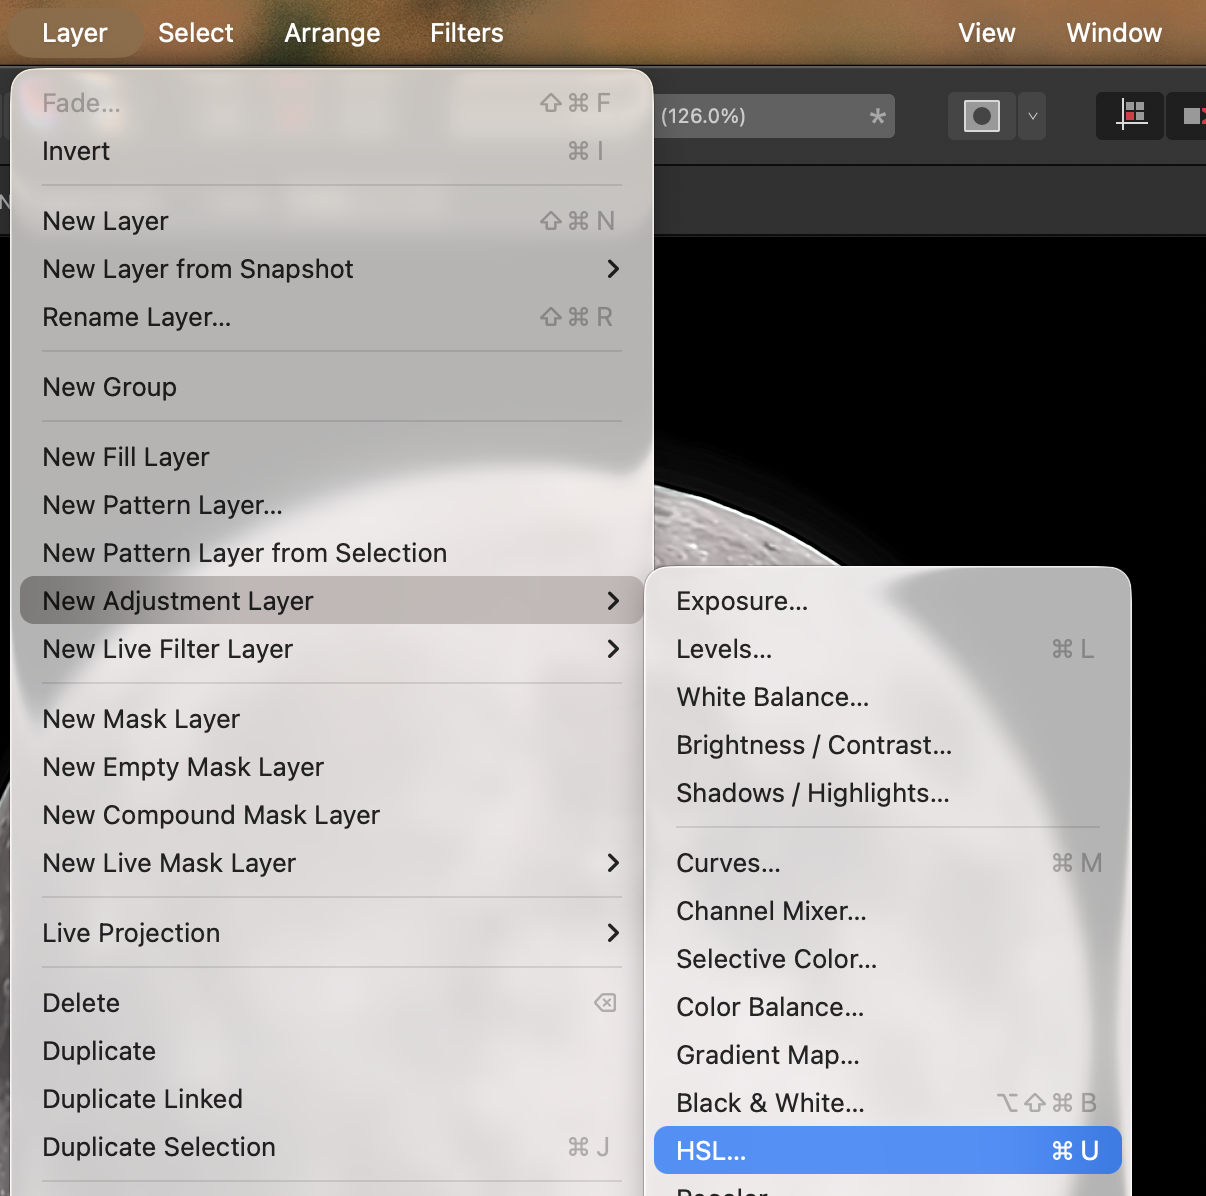
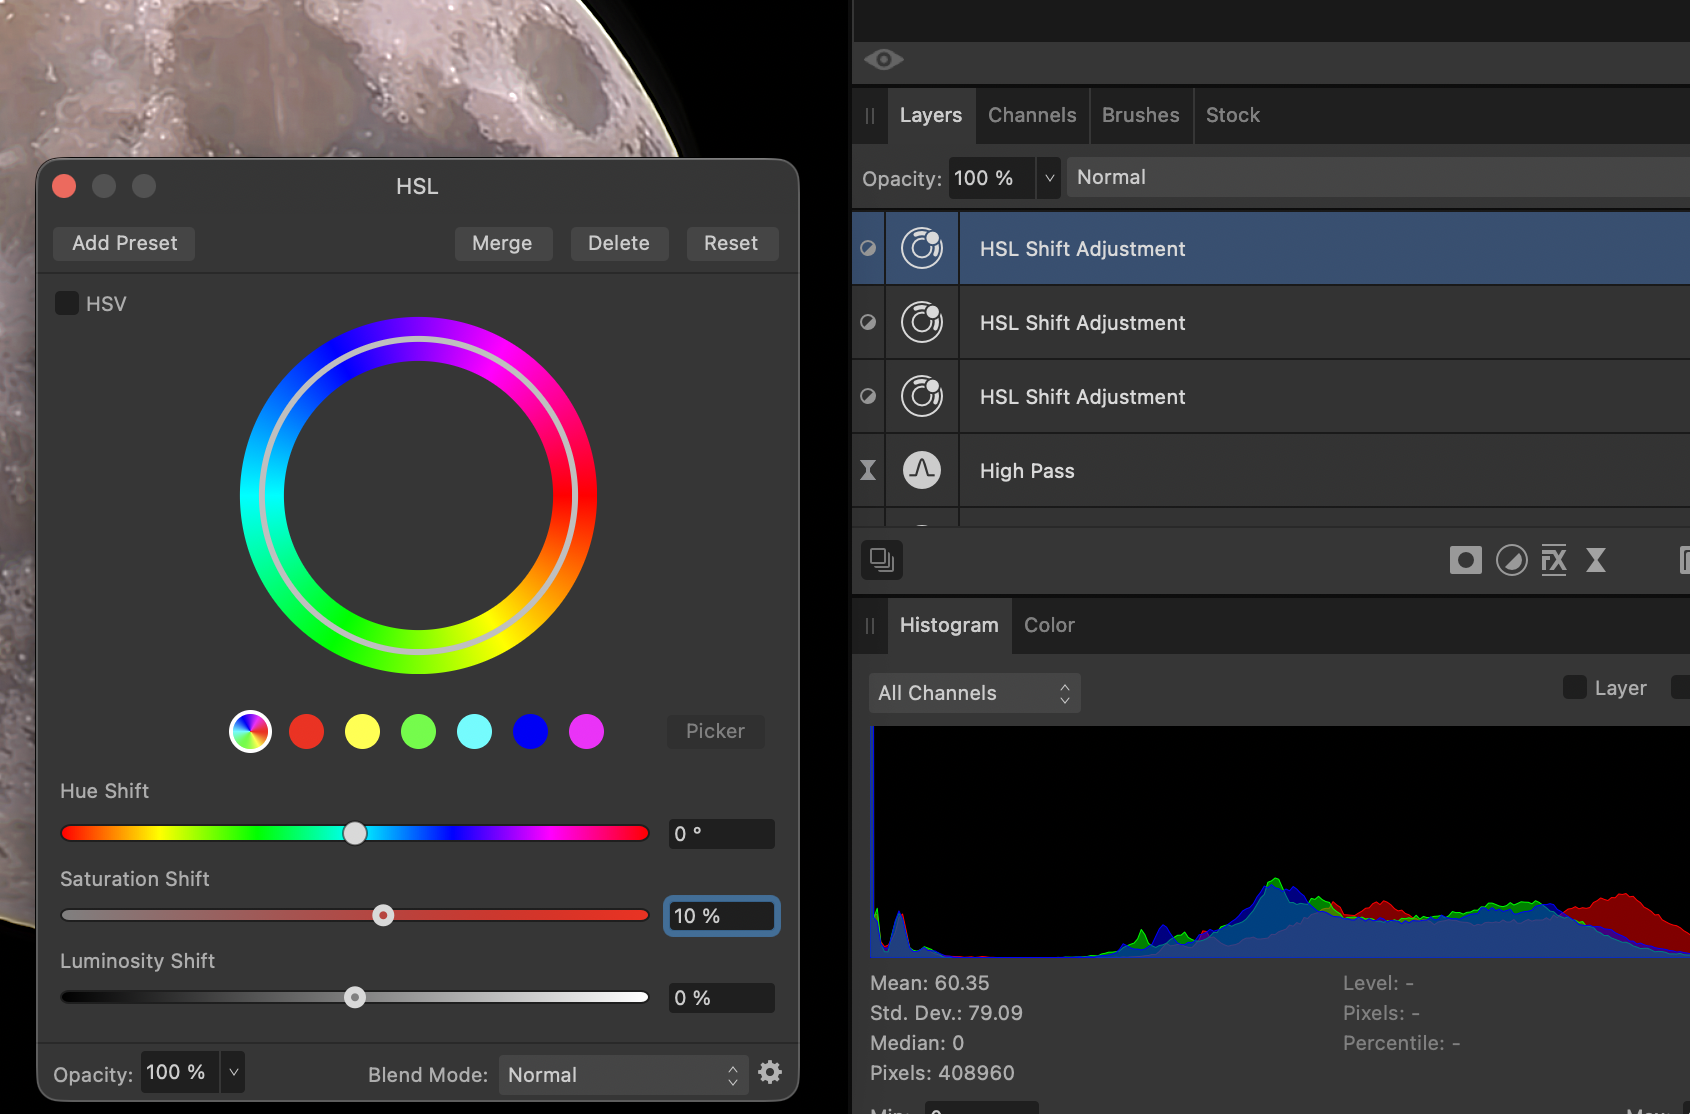
Below is what I ended up with. It's not very sharp, I believe it's due to the video being compressed by youtube. 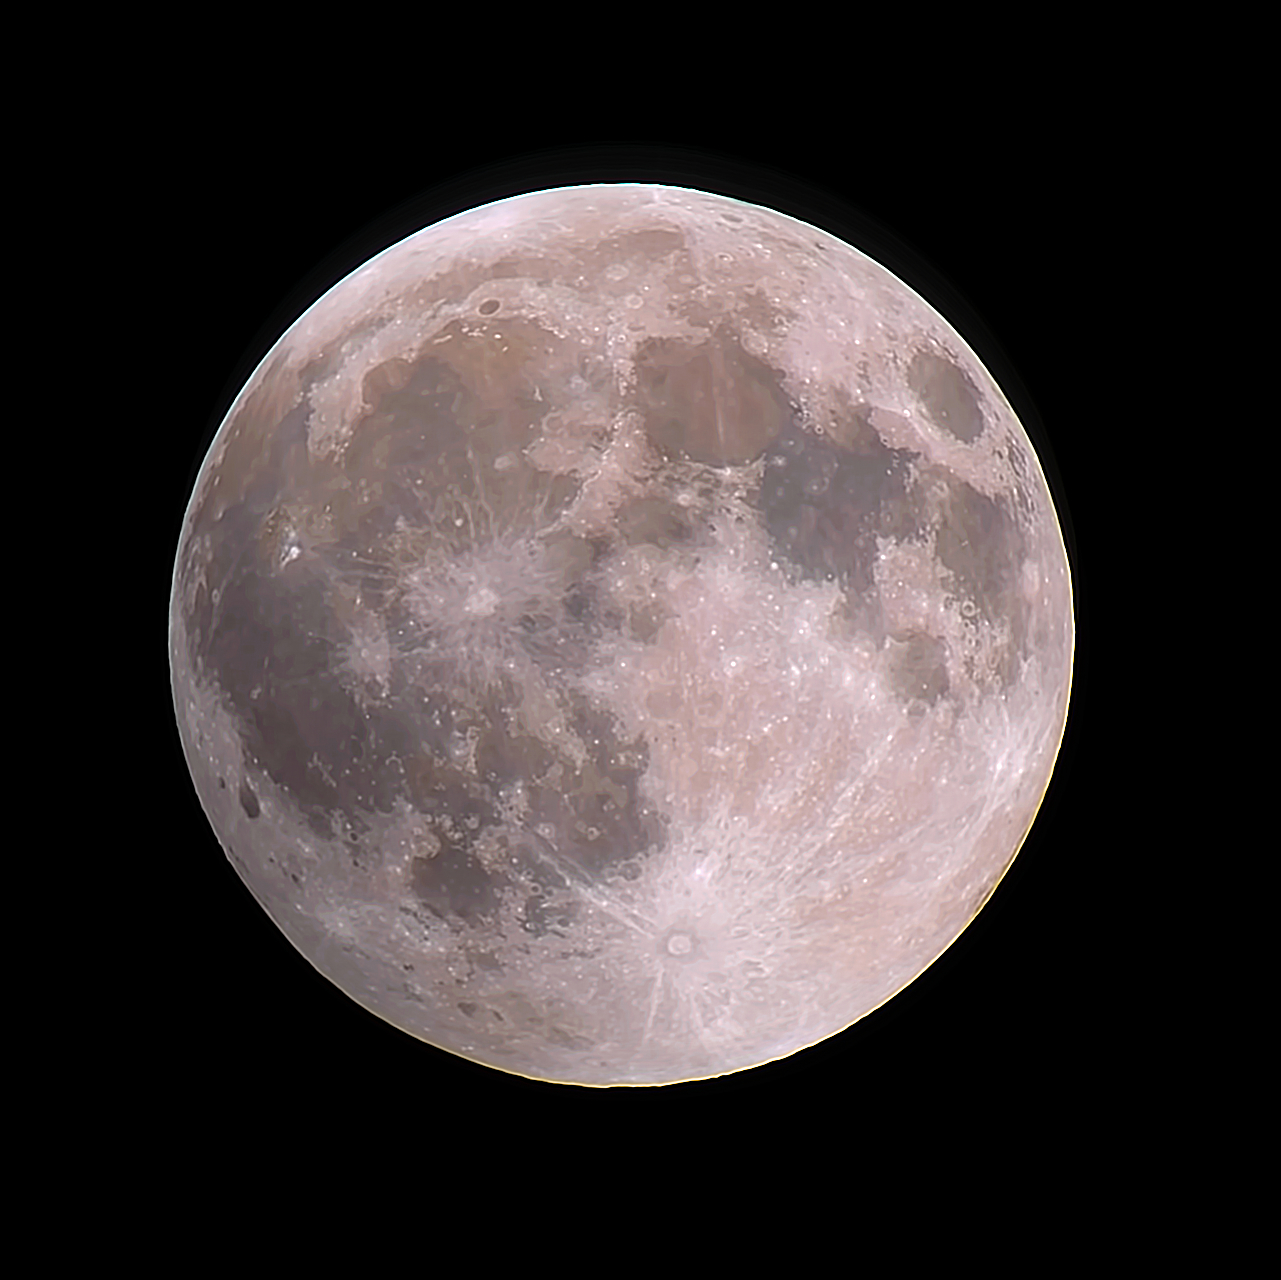
Here's what I got from the same video before youtube: 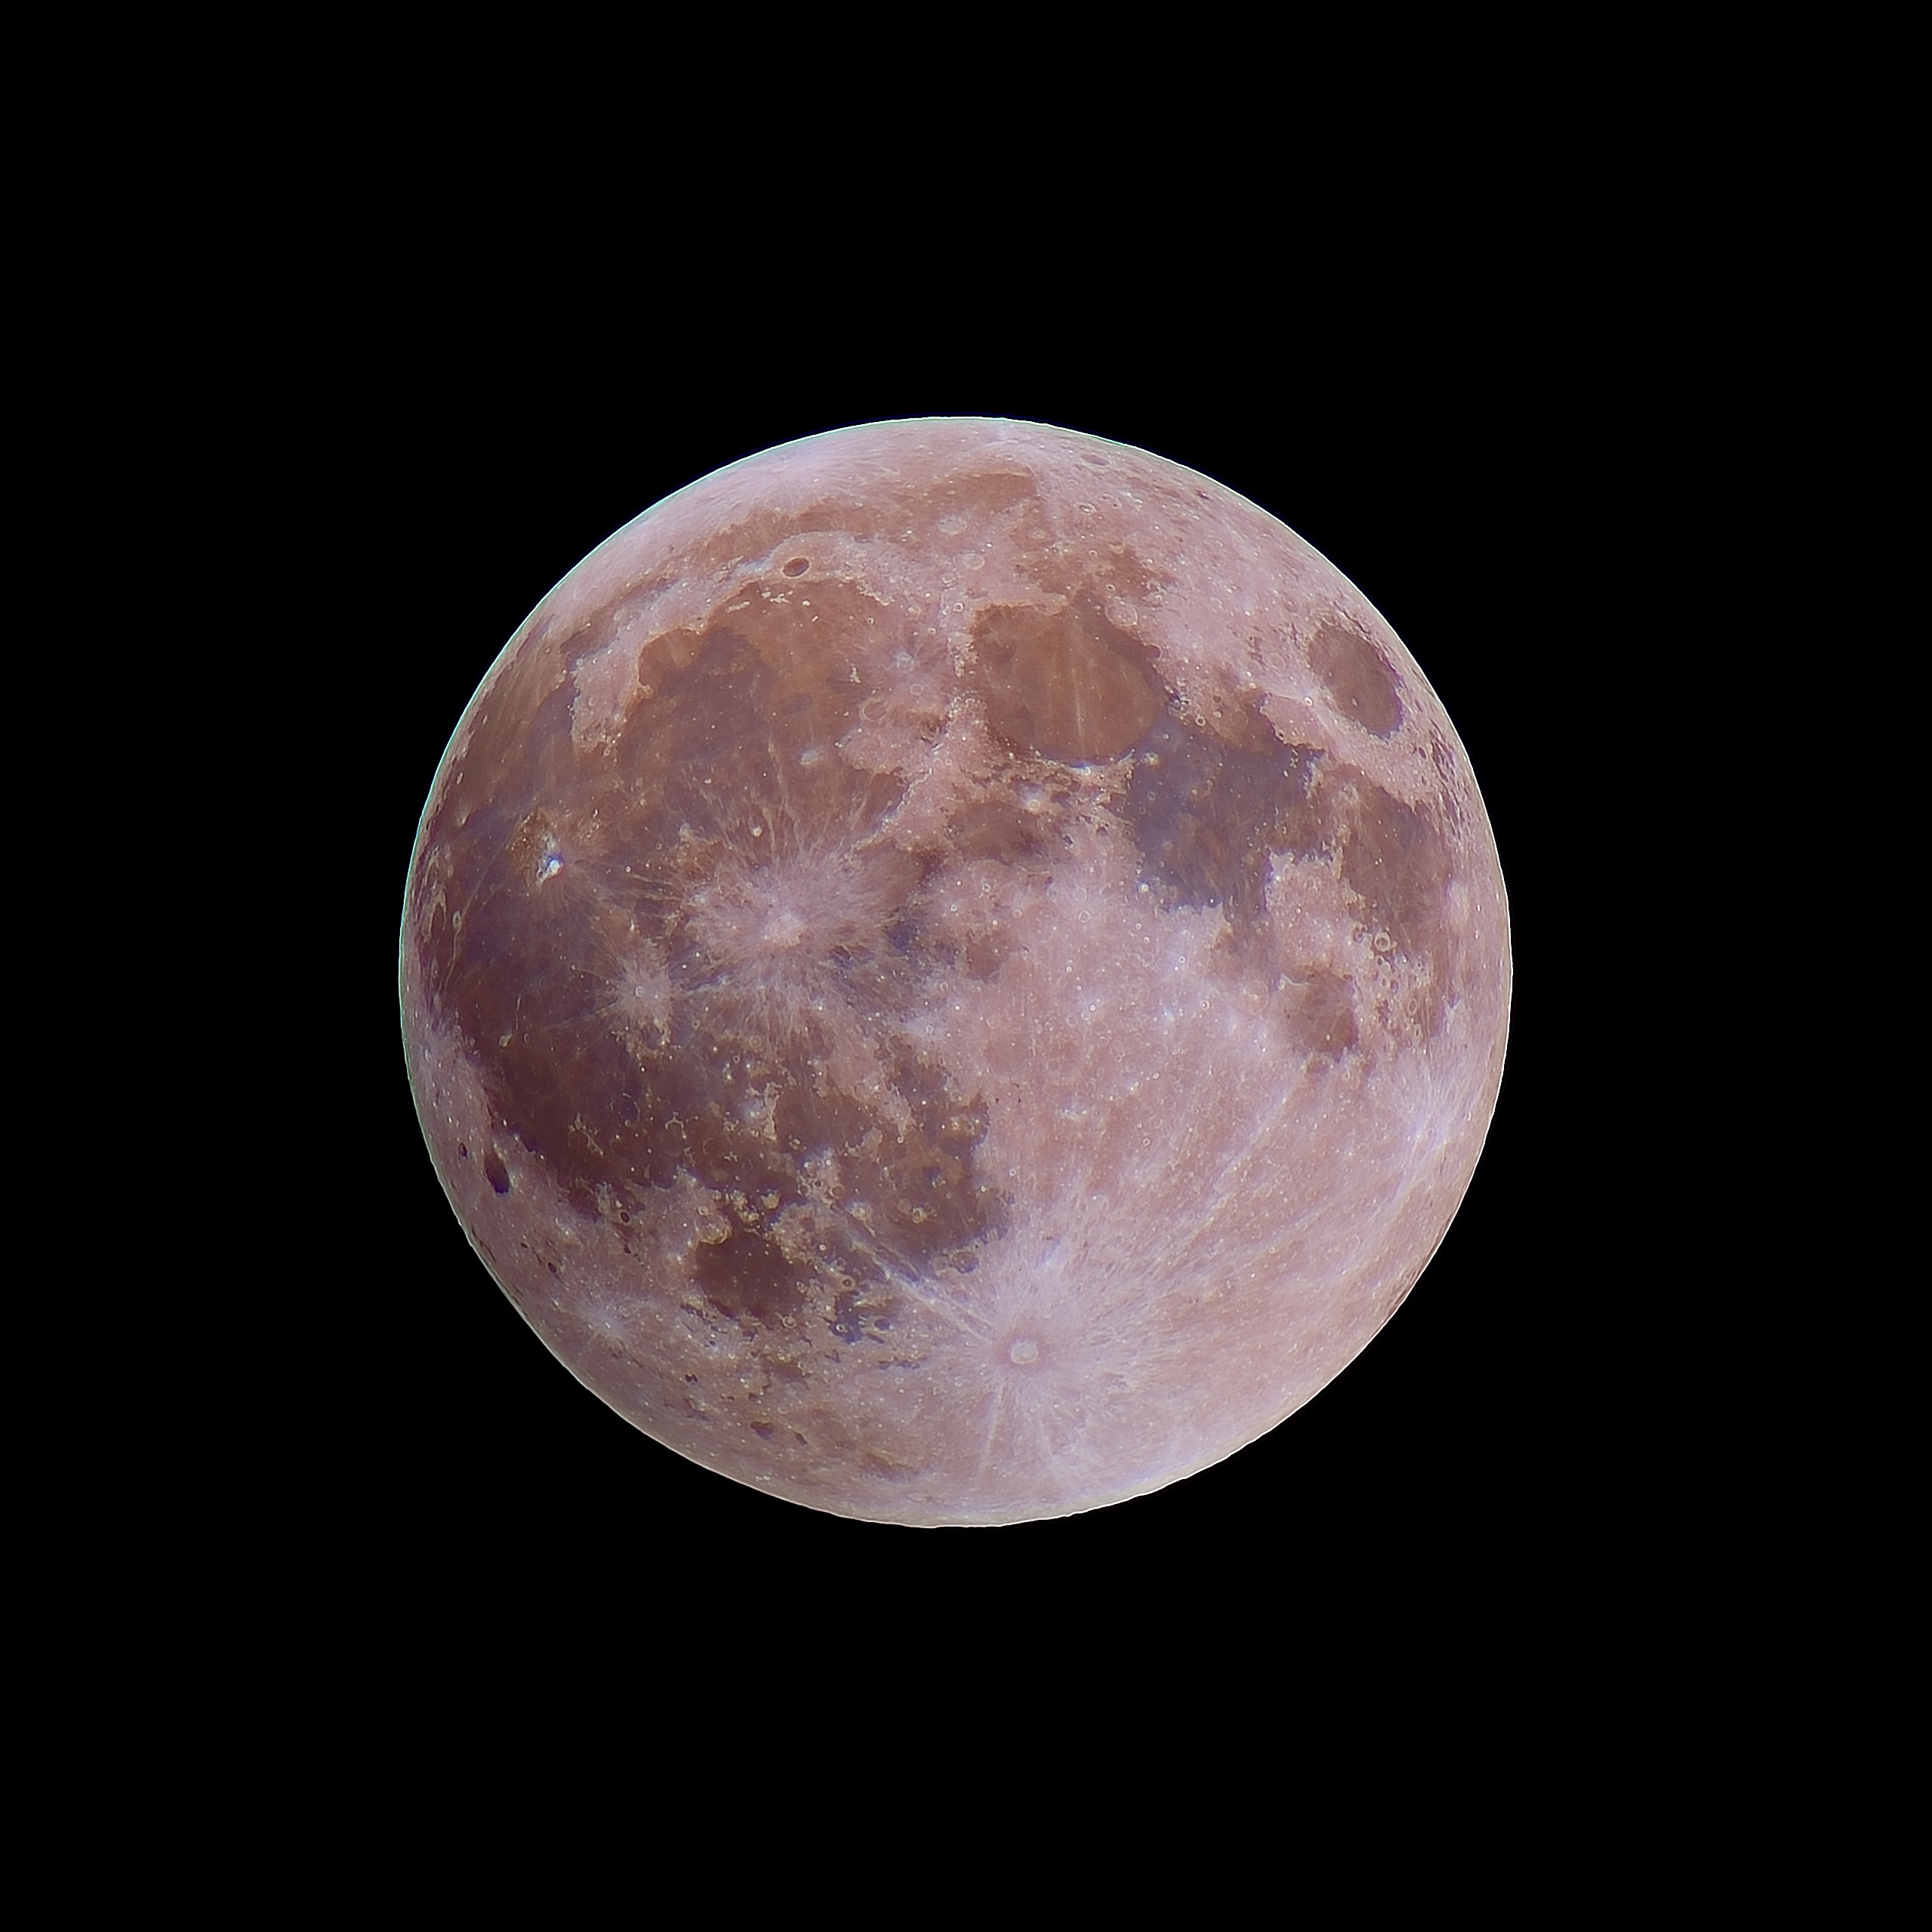
Conclusion
I'm sure I've made some mistakes or misunderstood some concepts here and there, but hopefully this post can be a good starting point for anyone who's like I was a while back and is curious about how to get a sharp shot of the Moon. Of course, you should try changing all the editing parameters, such as the hue in the HSL layer, or adding more filters of different types... Below are some example Moon shots I've taken and edited using this workflow.